TR7 Electric Fan Modification
Article by Bruce Clough
I like simple things, and I like simpler maintenance, which explains why I put an electric cooling fan on La-La. The goal was to end up with an engine compartment where I could get at the front of the engine without problems (reduce space required for cooling function), reduce engine load (I need every little slice of HP I can get), while increasing cooling efficiency. These are the same reasons that today’s cars all have electric fans on them.
System Requirements
What we want to do is to install a system:
· that turns on the fans when the water starts to heat up
· has a manual switch to turn the fans on as a back up to the automatic switch, and as a way to check the fan operation with a cold radiator
· must cool as good as the stock belt driven fan
· must make maximum use of existing car wiring, principally from the A/C system
The fan could either pull air, or push air, but in this installation the fan will pull air since they are more efficient in cooling while pulling. This means that the fan will be mounted on the engine side of the radiator.
Assumption: A/C But No A/C
The car originally came with an A/C unit on the car and that you don’t use it [Note 1]. This is the case for the vast majority of TR7’s with air, especially DHC ones. We are going to use parts of the existing A/C system, especially the wiring and radiator thermostat, to simplify our installation (why add wires and sensors if they are already on it?). Now, one might ask why not just leave the old fans on? The answer is that the old fans are less efficient in cooling, use twice amount of electric power as the new fan, and weigh at least six times more since they require a metal shroud and frame.
Other Systems Impact
Existing Fan & Drive Belt– the existing fan will have to come off to allow clearance for the electric fan. If you need the air injection (see below) you can remove the fan and clutch and the electric fan will fit. If you don’t need the air injection unit, or the car doesn’t have one (FI cars), then the fan and pulley can both come off. In this case you’ll have to replace the alternator drive belt with a shorter unit. I use a Gates 7312 belt (10mm by 805mm) instead.
Air Injection: since the pulley the fan is mounted to also drives the air injector pump on non-fuel injected TR7’s, taking the fan off will kill that function unless one saws off the fan mount extension on the pulley. In this case I’d get another fan/pulley unit so you can put it back to stock [Note 2].
Crankshaft Pulley – A/C cars have an extension hub as a part of the pulley. This extension drives the A/C compressor. This has to be eliminated in order for the new electric fan to fit. This can be done in two ways, either cut the hub off, or install a crank pulley from a non-A/C car.
What Do We Need To Use From The Existing Systems?
Figure 1 is the part of the (1980) TR7 wiring diagram for the A/C system.
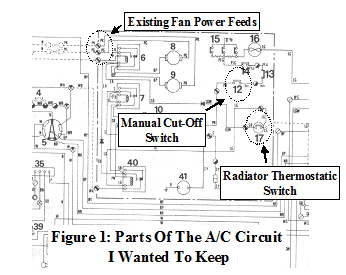
We want to keep the same power feeds so we don’t have to run more thick wires and add fuses. We want to use the stock radiator thermostatic switch since: it’s already there, the separate thermostatic switch costs another $12, and no added wiring is needed. The existing manual cut-off switch is needed so we don’t have to add another hole and switch to the interior, i.e., keep it original looking as possible.
What Do We Add
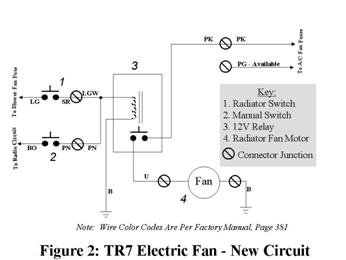
Figure 2 is a wiring diagram of the new system using both existing and new components. The new parts that had to be purchased were the fan, relay, and a few connectors and shrink-wrap tubing. That’s it.
Fan: The fan of choice was a 14” shallow, high efficiency fan bout at Advance Auto parts for $45. Note that this is well under the cost of electric fans from British Parts Suppliers. Not to knock the British parts suppliers, but if you were to use their systems you’d be spending $70 on up for the same thing. Those vendors are great for particular car parts, but for generic parts such as this fan it’s best to buy them locally. The fan came with mounting hardware and wiring, but not a thermostatic switch. Since I was going to use the one already in the radiator from the A/C systems this was not a problem.
Relay: The relay is just a simple 12V relay I bought for $4. One could use the old A/C relays, or a horn relay from a TR6 for that matter, but since I didn’t want to hack apart the removed A/C relay harness, I opted for a new relay. Besides, those old relays were Lucas anyway
Other: For wiring I used an old A/C harness connector and only used the wires I needed to connect the new relay. Four new spade connectors had to be added, and these were already in the toolbox. I also had plenty of wire included with the fan to connect up the relay. All connections to connectors were soldered and protected with shrink-wrap tubing. No crimping in engine compartments! This was the only part of the car where I had to cut-up an original part (I couldn’t find another connector in time – this will give me something to look for at swap meets).
Installation
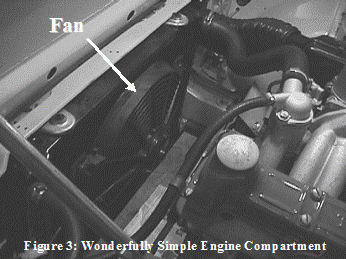
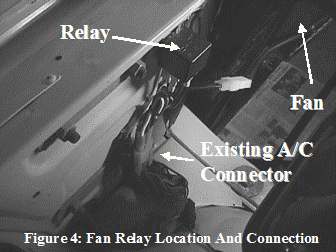
Installation took about a half-day [Note 3]. First of all we took off the fan, fan belt, and idler pulley, then cut off the crank pulley extension. A new alternator drive belt was put back on. The relay was attached to the body frame that goes in front of the engine (the one that holds the radiator) on the left hand side (to take advantage of the A/C wiring harness. The old A/C relay harness connector was modified to fit the circuit of Figure 2, and the fan was mounted to the radiator using the straps provided. The new wiring was then secured by wire ties, and tested. Worked the first time. Figure 3 shows the engine compartment with the components installed. Figure 4 is a shot of the relay mounted to the engine compartment where the A/C relays were.
Operation
Referring to Figure 2, the electric radiator fan is set into operation either by closing the manual switch (2), or the water temperature rises enough to close the radiator thermostatic switch (1). In either case, closing of a switch will apply 12V to a relay (3). The relay contacts close, applying 12V from the old A/C fan circuit to new electric fan (4). The manual switch gets it’s power from the radio circuit (used due to it’s close proximity to the manual switch) , and the radiator switch uses the blower motor circuit. Only one of the two existing A/C fan circuits is used. The other is still available as a source of 12V, 10A power in the front of the engine compartment.
Advantages
Several….
· Increased cooling efficiency – The electric fan is actually more efficient in cooling than the old belt driven fan. Not only was that fan a couple of inches from the radiator, but it was displaced up from the radiator. (Don’t believe me? Look at yours – note the fan protector at the top of the radiator.) The electric fan is close-coupled with the radiator to draw air better (less leakage around the blades), and the fan is pulling radiator air all over its area.
· Increased power efficiency – The fan only runs when needed. The old mechanical unit spun when the engine was cold since the fan temperature clutch always had some resistance to it. I haven’t run the numbers, but the electrical system might also be a bit more efficient than the mechanical drive (it is in every other type of application)
· Visual Simplicity – Nice & orderly!
Drawbacks
Nothing is free…
· Fan Failures – With the old fan unit one knew of mechanical failures (fan belt, idler pulley bearings) before overheating occurred since a broken belt caused alternator failure and a bad bearing makes noise. Now the electrical circuit could fail without a notice. Is this a risk? I chose to take this risk since the reliability of the fans is very high, and the fusing on the circuit is high compared to the current draw.
· Sneak Circuit – The way I wired it up, having the manual switch draw power from the green circuit, leads to power being applied to the ignition circuit if the switch is “on” and the ignition key is turned to “accessory” . In other words, turn the manual switch “on”, turn the key from “run” to “accessory” and the car continues to run. This is due to connections internal in the wiring harness downstream to where we wired the manual switch. The cure for this is to run a dedicated line from the radiator switch to car +12V. I chose to live with the anomaly rather than adding a wire since the chance this causing a problem is small.
Cost:
14” Electric Fan (Advance Auto Parts) $45
12V SPST Relay (From Pep Boys) $4
Radiator Sensor (From MG Automotive) $11
Gates 7312 Fan Belt (From Car Quest) $9
As I said before my cost in time was a Saturday morning. Not much when the alternative was watching Discovery Channel reruns (ahhh, the atmosphere!)
Notes:
1. Why the hell do you need A/C on a DHC? Do you sweat so much that you have to have the top up? Why bother owning the DHC? C’mon people, tough it out!
2. I always store away my original equipment for the next owner, so if I modify something I get another unit to replace it in my storage pile!
3. This doesn’t count the removal of the old A/C system. That’s about another half-day, and another article!
Please note: it is down to individual TR7 owners to satisfy themselves that what they are about to fit or modify is suitable for their car /engine. I accept no responsibility whatsoever with regard to any actions you may make or parts you may fit as a result of the information placed here. It is my personal belief that the information given here is 100% correct.