Trailer Hitch
Article by Bruce Clough
Ever since last summer’s TRF Summer Party I wanted to put a hitch on a Wedge. This way we could bring the bikes, or pull a camper that we’re buying off the Hartleys. Now with two Wedges we can do both, but it will take two hitches, no problem, I’ll have them made. But what do I use for a pattern? Hmmmmm.
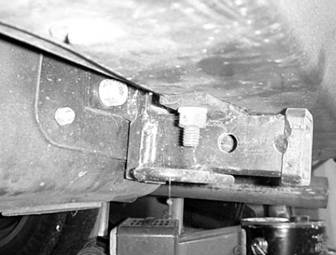
Then it struck me, Hartleys have a hitch on the TR8, why don’t I beg John for a couple of pictures? And John obliged, sending me several shots. Below is one of the pictures John sent:
The Hartleys Hitch On Their TR8
Now their hitch is a 1.25” model. We know that this is enough to pull a substantial trailer, but since our bike rack is set for a 2” receiver, we need to put 2” hitches on the Wedges. No big deal, I’ll pattern the hitch after Hartleys, but just specify a 2” size.
I then lied on the garage floor and took measurements of the distance profiles between the rear bumper and the spare tire well, both horizontal and vertical. Looked like minimum separation was 1.5” going to 2” toward the outside. Vertical distance wasn’t as critical. I figured the shop could get the idea on where to place the brackets from looking at John’s photos. But where to take it? I figured I needed a custom hitch place, not a U-Haul or Pep Boys, so I took it to Custom Way Welding, north of New Carlisle on OH 235. I figured that a hitch place with “Welding” in the name would be a good start. And so right I was. They listened to my needs, looked at the photos and measurements, and said “No problem, give us a week”.
I showed up a week later and was handed a box containing two hitches, mounting hardware, and a gizmo to pull the carriage bolts used to attach the hitch to the bumper through the hole in the bumper.
Hitches Made For The Wedges
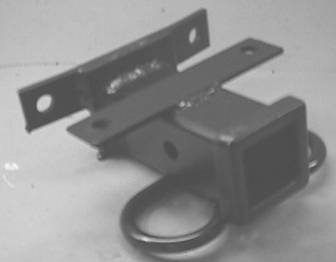
The hitches were powder coated and ready to go. Cost was $75 each, very reasonable since comparable hitches for small cars at Wal-Mart were $80!
Now to get them on the cars. On the ’79 FHC this was straightforward. The steps were:
· Lay the hitch up against the bottom of the bumper. Trace around the plate that attaches it to the bumper. Cut the rubber part off so metal will be against metal.
· Put the hitch up against the bumper where you cut the rubber out. Now trace the holes against both the bumper and spare tire compartment.
· Drill the resulting four 0.5” holes (make sure you empty the spare tire compartment to do this, Fix-A-Flat won’t handle a 0.5” hole).
· Pop the 1” rubber plugs off the inside of the bumper. There are two of them, one on each side roughly a bit more than a foot off the centerline.
· Using the tool provided, fish the carriage bolts and the carriage bolt brackets (keeps the bolt from rotating) through the holes. I had to file just a wee bit of the outside part of the carriage bolts to get them to go through the holes.
· Attach the hitch loosely to the bolts on the bumper. Do not tighten them.
· Push the bolts for the spare tire compartment mounts through the body from the inside, making sure that a wide washer is used on the inside.
· Snug up the bolts on the spare tire compartment, then the bumper – in that order – that’s it, you’re done!
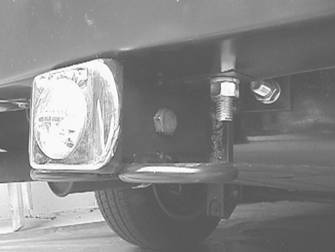
This is a picture of the completed hitch on the FHC.
Hitch Installed On The FHC
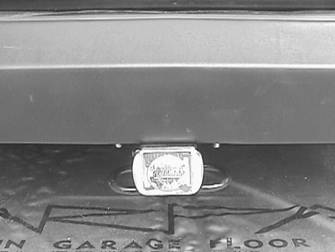
What’s that? You’re wondering about the hitch cover – oh, I just took a blank chrome cover and installed a TR3 Hubcap Medallion on it (Ron – now you know why I bought those hubcaps at the TRA auction). Heck if the Chevy folks can put bowties on theirs, I can use a world medallion on ours. The hubcap medallion is simply glued on. but I did attach a threaded rod to the medallion as the foundation that the glue (two part putty epoxy) would stick to. Yes the threaded rod was also glued to the medallion. I think it looks pretty slick, eh?
Another View From Below Showing That Snazzy Hitch Cover. Beautiful…
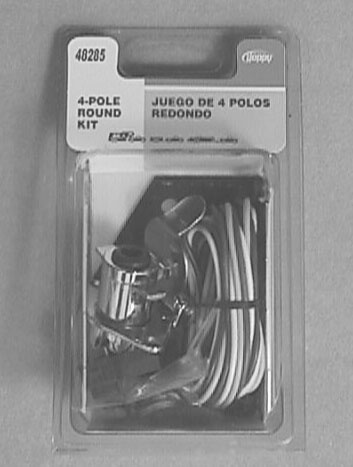
Great, now the hitch was on, but we still need to attach the lighting to the trailer, or at least if we want to be legal. I thought of possibly making the lighting connector from scratch, or just using a plastic plug type, but I wanted to make them look good. This means Pep Boys, where I picked up two Hoppy 4-pole trailer lighting plug connectors, Number 48285, if you’re curious.
Hoppy Light Connector Kit
This comes with everything one needs to put it on the car, except for where to attach the wires, more on that later. The steps I took to mount the connector to the car were:
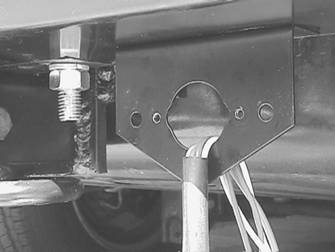
· Attached the bracket to the car to the right of the hitch. One side was secured with the existing rubber cover securing bolt, the other side I had to drill a hole for a sheet metal screw
· Attached the wires to the connector. I used this plan on connecting the wires. Yellow was left turn signal, green was right turn signal, white was tail lights, and brown was brake lights. Note that I didn’t list a ground wire here. I ran a separate wire for that. Had I been really anal I would have got a 7-connector plug for the ground and reverse lamps, but with these low trailers 4 will do.
· Covered the wires with plastic tubing to protect them from road debris. I used plastic off of an old TR4 used for the same purpose in the tail light area. Worked great. you need about a foot of it. Why only a foot? Simple…
Connector Bracket In Place Next To The Hitch, Wiring Getting Set To Push Through The Trunk Floor. Note Plastic Shield On Wire
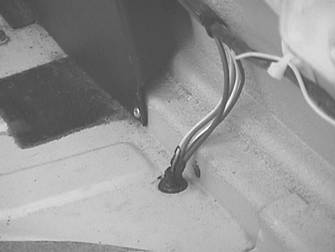
· Bring the wires up through the trunk floor using a hole close to the hitch. I found one just inboard of the right rear light cardboard cover in the trunk. I took a hole punch and made a hole in the plug big enough for the wires to push through, then ran the wiring through bringing just the end of the plastic covering from the last step through the hole. I also made sire that the cover extended to the connector, i.e., no individual wires could be seen underneath.
· Attached the wiring connector to the bracket using hardware supplied. You might have to make the holes bigger – I had to.
· Connect the wires. Using my trusty 1980 wiring diagram I connected the wires to the existing LUCAR connectors. I could have used the clip-on connectors they supplied, or I could have spliced it in myself, but since I didn’t want to modify the wiring harness I stuck about 0.25” of stripped wire into the connectors, then pushed the connectors on to the light sockets. No, it’s not the way NASA would do it, but it will hold fine for the type of use the cars will get, no cuts to the wiring harness were made, and it’s easy to modify the connections.
· I added a ground wire. Now one might think that the ground could be handled through the physical connection between the car and trailer – metal on metal, right? We just to be sure I added an extra wire, attached to the car at one end using a wire lug over a tail light stud, and a bullet connector at the other. The outside ground connector I secured to the connector bracket with a nylon wire tie. Not a perfectly aesthetic way of doing it, but very practical.
· After connecting up to all the lights I went back and used wire ties to keep the wires together, then I used black silicone sealer to fill up the spaces between wires where they went through the car body. I also sealed the plastic wire cover to the car body at one end, and the connector at the other. Less water equals reduced corrosion chances.
Hole In Trunk Where Wires Go Through
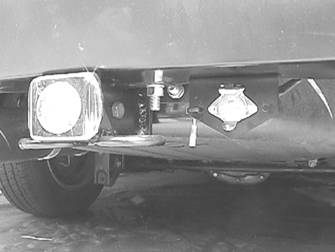
Now clean up and you’re done. All put together and ready for a trailer!
Hitch & Connector In Place & Ready
How much can you tow? Only as much as the manual says you can. The hitch is a brute. I’m not pulling anymore than several hundred pounds per car, and the manual states I could pull 1100 pounds of un-braked trailer.
Go figure. Max braked trailer weight is 2240 lbs. Yeah, right!
Please note: it is down to individual TR7 owners to satisfy themselves that what they are about to fit or modify is suitable for their car /engine. I accept no responsibility whatsoever with regard to any actions you may make or parts you may fit as a result of the information placed here. It is my personal belief that the information given here is 100% correct.